

WK 1 | WK 2 | WK 3 | WK 4 | WK 5 | WK 6 (The Reveal)
What is the One Room Challenge? Linda from Calling it Home created this challenge years ago for herself and friends to design and complete one room in 6 weeks. They are now on their 13th season! The challenge is now a bi-annual nationwide event that House Beautiful has partnered with ORC to follow 20 featured designers as well as guest participants like me!
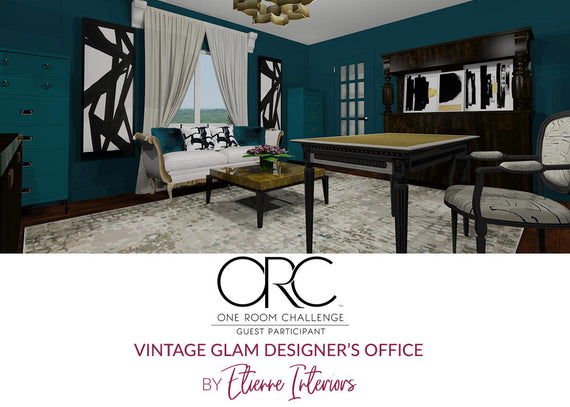
I'm Still Here!
Last week, I sadly missed linking up my week 4 blog post as I was really under the gun time wise. The funny thing is, I planned on adding in the link AFTER I put my toddler to bed. As many of you with small children will know, children are so warm and cuddly when you are putting them to bed! Somehow, I never feel tired at the beginning of our bedtime ritual, but about 10 minutes in, I too have droopy eyelids. The long and the short of it is, I woke up at 12:35am which was 40 minutes too late to linkup my post! At any rate, just wanted you to know that I AM still pressing on with the office as we head into the final stretch :)
Ambitious Goals
I feel that my design plan for the home designer's office is ambitious. Not only did I spend quite a bit of time coming up with the design and rendering to set the right course (and begun all of this the day before the challenge began), all of the furnishings within the room are refinished. These are beautiful items that I have amassed over the years and set aside for installation when the time was right. So add the refinishing on top of the actual painting, and custom moulding and there is quite a bit of work to get done. As I head into the final days, time is definitely getting the best of me. However, I do intend to keep going and see if I can sprint to the finish!
Louis XVI Desk Reveal
In my last post, I was just about finished the makeover on my Louis XVI desk. Well, I am proud to present the final photos!


Isn't she gorgeous! Very happy with the way this project turned out overall. My only reservation is for the desk top. After removing the original red felt top, there was so much old glue and divots in the wood, that the surface was quite uneven. Trying to level it out meant scraping and damaging the existing base wood layer, so I opted not to do this. This translated through the vinyl top that I laid on top and so there are some lumps and bumps here and there. This is however only a temporary desk top as I would ultimately like to install a custom leather inlay at some point. But for the interim, I love the colour and the vinyl is much more functional than felt as I have a cat and his hair ended up all over my desk!
Can You Finish That In 7 Days?!
So, let's take stock of what's left to do:
- Reupholster the French daybed
- Install the moulding on the feature wall
- Paint the room
- Create custom artwork
- Purchase chandelier
- Purchase rug
- Find or refinish desk chair
- Accessorize the room
That's quite a laundry list of things to get done! There will likely be compromises made.
French Daybed
I have stripped the fabric from the French daybed. I've decided to make this a budget re upholstery job by utilizing canvas drop cloth sheets from the Home Depot. When I compared the drop cloths to my Restoration Hardware Belgian Track Arm sofa (in our living room), I was pleasantly surprised that the fabric colour was almost an exact match.

The canvas drop cloths have a linen-like appearance which is of course very French. I want the daybed to be understated so that I can punch it up with some lovely cushions, so this will do just fine. And at less than $3/m for the cloths, you just can't beat it when under a budget. The 8oz cloth has a nice heavy feel and will stand up well to frequent use.

Once stripped, I used the General Finishes Gel Stain in Java that I purchased from Lee Valley. This is a great product when you want to add stain colour over an existing stain without stripping. I followed this up with a translucent bronze paint to add a bit of glam and dimension to the finish. Checkout the compete DIY upholstery and refinishing tutorial here.
Now that the piece is re upholstered, its time to create the mammoth seat cushion. This can get quite expensive since foam is usually pricey, not to mention the sewing of the custom cushion. But if you DIY it, you'll save quite a bundle! I've decided to get creative in this respect and utilize a ready made twin foam mattress from Ikea. The price of their Morgedal foam mattress comes in at $269 which is about the price from an upholstery shop but I was fortunate to find one on Kijiji that is brand new for $100, so I snapped that up. It will require a bit of cutting as my daybed has a curve to the front edge, but that won't be difficult to achieve.
The Painting Has Begun
I wanted to get all or most of the refinishing completed before painting since painting typically goes quickly for me. I have begun priming the walls as is necessary with Benjamin Moore's "Teal". It is such a deep and lovely colour, but oh my, just take a look at that tinted primer! When hubby sees this, he's going to think I've totally lost it! Can't wait to cover it with the actual colour.
What About the Feature Wall?
Truth be told, I'm not sure its humanly possible for me to have the wood moulding completed in time. I'm going to make the final decision this weekend based on how the re upholstering goes on the French daybed and the painting. It would be a shame not to have the paneling, but I do have another idea to spruce up the wall just in case I don't have the time. I'll leave that for a surprise :)
I'm A Marathoner, This Is Kilometer 36
I am a marathon runner and have learned many life lessons through this type of discipline. At some point during the long 42.2 km run, you have to dig deep down and summon a different kind of willpower. Usually for me, this comes around the 36 km mark. I liken Week 5 of the One Room Challenge to km 36. I'm digging in, I can see the finish, and I just have to keep moving because everything small task that gets completed from hereon in gets me closer to styling and photo day. Whatever the outcome, 5 weeks ago, I only had the urge to begin this project, so I have to take a moment and appreciate what I have accomplished on top of all other responsibilities. That's the great thing about this challenge.
Please come back weekly to check-in and see the progress on the room. As promised, I will also post separate DIYs for the refinishing projects in the room. Its going to be a lot of fun!
See weekly updates on my instagram: @etienneinteriors.com
Visit me on facebook: @etienneinteriors
For weekly inspiration, please checkout the Spring 2018 One Room Challenge:
Featured Designers
Guest Participants
Thanks for stopping by!
Catherine


jbFgNtWaUCn
on September 7, 2020 21:00
YOsaNCtRVEZIcxWk
kzLvPJUAtQ
on September 7, 2020 21:00
RLugGPfVeCcqokKU